background

Sunday, December 12, 2010

Upcoming Photoshoot + Chemise

I'm so excited to announce that next weekend my designs will be involved in a photoshoot in Marin County by the wonderful Aura O'Brien.
There will be several other designers shot over the 2 day costume and clothing extravaganza, and I was so excited when she contacted me to see if I would like to be involved!
I spent the last week scrounging up my different half finished projects and met her yesterday to drop off my things since I'll be out of town and unable to attend.

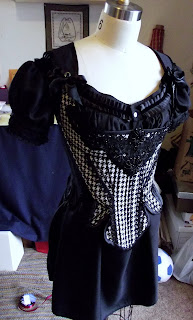
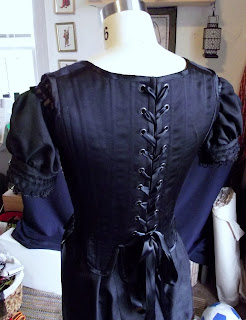
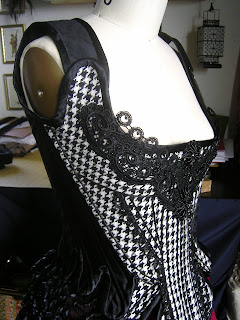
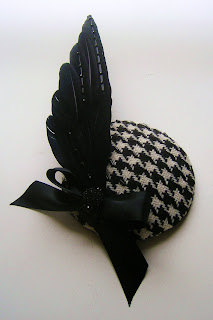
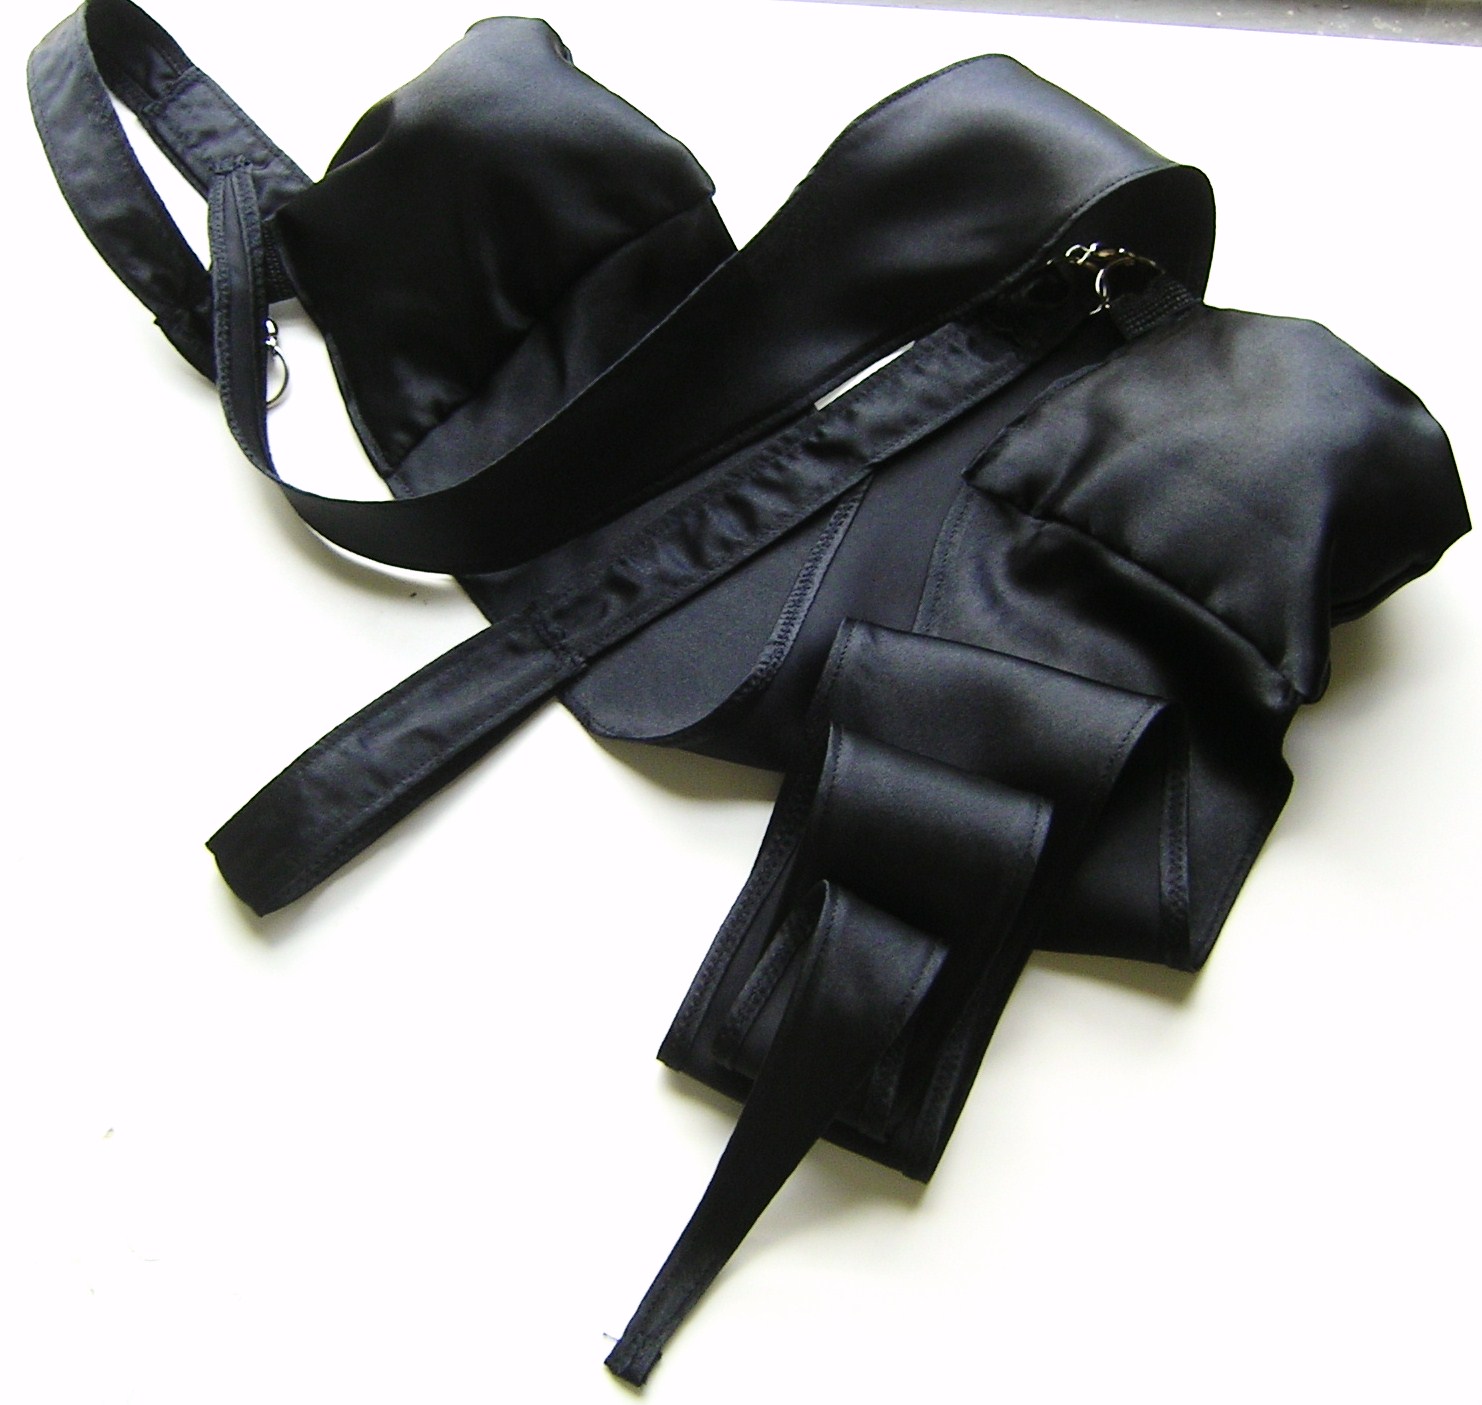
One costume she'll capture is the houndstooth corset and fascinator, though I needed to provide something to be worn under the corset since it is so low cut. Therefor... a quick trip to JoAnns and a search through my pattern collection, plus 6 hours of cutting/pinning/sewing created this...

I used Simplicity Pattern # 9769, "Misses Authentic Civil War Undergarments" and sewed their chemise with only a few diversions from the given instructions.
First, it recommended flat-felling the seams, which is a couture technique of encasing the seam alloance within iteself, so as to provide a clean and beautiful inside of the garment as well as out. But since I was in a bit of a rush I simply used my serger to machine finish all of the interior seams. Sure, it's not as painstakingly beautiful, but it's clean and does the job!


I also chose a poly Shantung instead of the recommended cotton because my chemise is acting as an outer-garment instead of as underwear. I would have loved to use a silk shantung, but alas my funds don't provide for such luxuries just yet! Using the flat, slubby side of the fabric, I think the chemise turned out beautifully!


I also added a pearl button at center front instead of the recommended hook and eye, ans shorted the chemise to shirt length instead of dress length because it will be tucked into a skirt anyway, and I didn't want to buy the extra fabric.


Monday, November 22, 2010

I am Thankful

So I haven't posted in a while, but I swear that I've been busy.

I've started in on getting my Pattern making Industry Certification from Apparel Arts School of Pattern making and Design in San Francisco. It's been a really wonderful experience so far! I am currently in a one-day-per-week pattern drafting class. It's at your own pace, and by completion I'll have learned how to draft zillions of variations on skirts, moulage (torso), darts, lines, necklines, armholes, collars, sleeves, pockets, & pants. That's pretty much the whole shebang. With that arsenal, one could create a pattern for just about anything!

If you're interested in Pattern Drafting and would like to learn, I highly recommend Building Patterns, The Architecture of Women's Clothing. It's definitely a text book, but if you follow it chapter by chapter you'll get a comprehensive explanation and tutorial of all aspects of women's wear, and most of which is applicable to men. Very Nice!

I've also recently completed a construction class, where we went through 8 weeks of construction techniques! Fly front zippers? No problem! Felled, French, and Hong Kong seams? Got it! I'm thinking about posting some tutorials soon!

I've been working on a corset that coordinates with my houndstooth wing fascinator for a photoshoot. Finally, it's about done!


This lady has a lot of hand sewing hours put into her.
The Bias binding is hand sewn throughout the entire hem, and spiral steel boning gives a comfortable support.


Note that this will be worn with a Chemise, so there won't be as much chest exposed!

I think it's turned out beautfully and I hope to offer them custom in my Etsy store.

Happy Fall! I'm going home for the Holidays and will be welcomed by snow! And I thought it was cold here!

Thursday, October 14, 2010

Feather Fascinators


I've added two new fascinators to my Etsy Collection!

Many thanks to Kim of Topsy Turvy Design for letting me borrow her vintage mannequins. Aren't they beautiful?

Check out her revamped website here. Her designs are beautiful and I've seriously learned from the best!!

Thursday, September 23, 2010

Deck of Cards!


I'm so excited to announce that my Deck of Cards hats are now for sale at Topsy Turvy Design!!
Please go go www.topsyturvydesign.etsy.com to check them out and... ahem... BUY ONE!
More photos are available on Etsy.


Tuesday, September 21, 2010

Fascinating Fascinators


What can I say? I've been in a hat making mood. And because the buckram scraps I've salvaged from Topsy Turvy's cutting room floor are small-ish, I've made some small-ish hats! They're still awaiting their veiling, but they are mostly complete!

Each hat is constructed out of buckram, a stiffly starched hat making fabric, and millinery wire, which is a wire wrapped in thread. Add a sturdy zig zag stitch and some hot glue and those are the bare bones materials of millinery.

I hand beaded each hat, adorning with rhinestones, bugle beads, seed beads, feathers, bows, brooches and buttons.

This one is made of fabric from my Burning Man costume. It's waiting for the perfect veil.

I love peacock swords, and prefer them as a colorful alternative to the often used peacock eye. Their opulence and depth of color are amazing! Each dot on the hat base is hand beaded with miniature jet black seed beads.

This woven houndstooth pattern is accentuated by jet black hand beading. I made the feather wing, and nestled is amongst a soft satin bow. Chic!

Thanks for looking. I hope to post these designs for sale on Etsy soon.

Friday, September 10, 2010

Deck of Cards Hatties

As promised, photos of the other three hats in the Deck of Cards line.

These beauties are going up for sale any day now at Topsy Turvy Millinery!


Enjoy!

Wednesday, August 25, 2010

Hatties!!

I'm so excited to post photos of these hats!

Today I finished the first of four hats of my design that are due to premier through Topsy Turvy Millinery in time for Halloween.

The spade pillbox is handmade with love out of buckrum and wire, covered with leather, adorned with rhinestones, and lined with satin. Rhinestone dotted veiling ices the cake. I love it, and can't wait to see them all together!!

Next is my Burning Man hat, whose feathers are now adorned with rhinestones. This is my last effort to chronicle it before taking it to the playa, where it will be subjected to some intense elements.


It's been hot here in Oakland - I hope everyone is staying comfortable!

Sunday, August 22, 2010

Renaissance Bodice

In honor of it's Etsy sale, here are a few photos of a Renaissance bodice I made last year.


It's made with a woven floral thick cotton brocade on one side, while the other side and bias tape are both made of a dark navy blue wool. Each piece is stabilized with with Rigaline boning and top-stitched with Navy cotton thread.

It is completely reversible, composed of four mirrored pieces which lace up the sides through brushed gold grommets. Can be worn as a solid color/design, or you can choose to reverse only one panel.

I'm so happy that it has found a loving home!

Friday, August 20, 2010

Teatro Zinzanni


I've spent the last ten months interning two days per week and Teatro Zinzanni, San Francisco's premier Circus Dinner Theatre! From a very young age, I've been in love with clowns and the circus, and I think my family was less than surprised when I took up learning circus arts and costuming.

My internship involved getting my hands in many aspects of the costume shop: from sewing with gorgeous beaded fabrics, to buying coffee for THE Joan Baez, to rigging in "manties" (man panties) out of powernet that I attatched to dress shirts for actor's quick changes. But, the little girl in me becomes ecstatic when handed a rhinestone project, such as the one I received on my last day of work.

The madness of the costume shop hours before opening.

The current show which opened last night is all about Egypt, or, the fantastical Egypt that the fabulous costume designer Beaver Bauer conjured. Our lady Cleopatra is a bit of a clothes horse, changing six times into six equally breathtaking embodiments during the 3 hour show. Yesterday I was charged with adorning her micro-mini act costume (what she wears to perform her tissue act in) with thousands of rhinestones.


Each lotus petal was specifically designed, with each having a pattern of gems that needed to be copied symmetrically on the other cup. That alone took about four hours!


Having completed my internship, I feel only what I can equate to a kid on the last day of school. A sort of, "Whoa, what a whirlwind" paired with, "Now what?".

After returning from Burning Man, I'm going to start at Apparel Arts, a sewing trade school in San Francisco that has a industry certification program for Pattern Making. Classes start Sept. 11th, so wish me luck!

Sunday, July 25, 2010

Captain Planet! (He's a hero.)


I'm very bummed that my camera somehow deleted most of my photos from this night, so these few will have to suffice until Halloween and we get a chance to wear these costumes again.

A friend from Zinzanni was having a birthday party, namely, a Superhero/Supervillian Pub crawl. After much brainstorming (Pinky and the Brain? The Gulf oil spill? Quail Man?) we decided on Captain Planet and his arch nemesis Captain Pollution.

We went to Discount Fabrics in Berkeley to buy 2 yards each of yellow, purple, sky blue, and red stretchy knit fabrics. Ironically enough, Captain Pollution's vest and shorts were made of Organic Bamboo cloth.

Using some proper fitting pieces as guides, I built leggings, a long sleeved shirt, pull on vest, shorts, long fingerless gloves, and shin guards for each of us, in our respective colors.


Looking this good, you know calamity had to ensue. Imagine this riding the BART from downtown Oakland into San Francisco, and proceeding to party in the Tenderloin. Imagine if you can.

Thursday, July 22, 2010

I'm alive!

I haven't fallen off the face of the earth, I swear! Lack of a computer battery, camping, and much needed family visits have turned me into an inconsistent blogger! Though, don't worry, I've been cooking up some tasty treats - a collection of four pillbox hats that will be sold through Topsy Turvy Design just in time for Halloween! I'll post photos as soon as I can muster them up.

I've also been working on a skirt for Jody of Abney Park. She and I were in a few choirs together in High School, and I've asked her if she needed a costumer to create some beautiful custom pieces for her. To my happiness, she said yes, and I am building a skirt, a hat, and maybe a corset or two of her own design. I'll post photos once I'm back from my day sewing at Teatro Zinzanni!!

Friday, June 4, 2010

Satin Poi

So, I'm learning that if one wants to sew, or be crafty in general, for a living, one needs to find an under-served market and carve their niche. I've been spinning Poi for about two years. Just out of curiosity, I searched for poi on etsy and was delighted to find that few sellers focus their efforts on poi, and those that are available seem to vary in degrees of quality and presentation.

After procuring all of the essential hardware, I developed my own pattern and started a mini production line.
I think they've turned out really well - and they spin smoothly with little effort. They're great for practice indoors!! Later today I'll be posting them for sale on my etsy page, La Petite Menagerie.

Ch-ch-ch-check it out. They're fully customizable in fabric and length of handles and tail.

Friday, May 21, 2010

Teardrop Pill Box Hat


I'm so excited about this hat - I think it has turned out adorable and is a cute topper to my costume! On Monday, I made a paper mock-up of a teardrop shaped pillbox. I brought it in to my internship at Topsy Turvy Design on Wednesday, and Kim set me up with all the materials and tools to make it right then. I worked on it for a few hours then, building the majority of the hat out of millinery wire, buckrum, batting, velvet, a sewing machine and some hot glue. She even let me raid her appliques, and helped me decide on the perfect one. She gave me a few dyed peacock feathers and finishing bits, and sent me on my way to finish it up - which I just did today!

I had most of the feathers on hand, waiting for the perfect use. Today, I lined the hat, which included padding out the inside top and using spray glue to adhere black satin. Then, folding and pleating where necesarry, I pinned the lining up the sides, and hand sewing it all in to place. The elastic cord is sewn between the layers to keep the hat on.


Pretty cute for my first start to finish hat!! I even added some peacock and pheasant feathers to my bustle/tail to tie the colorways together. Besides the tray, which I'll need outside help with, I'm considering this costume DONE!

Tuesday, May 11, 2010

Monday Skirt


I spent a few hours on Monday making this cute little skirt to go with my Burning Man costume. I think I'm having second thoughts about the bloomers and want to have some options. So, this skirt was born out of a remnant of deep red satin, brown lace, and a black satin sash. I think it will complement the corset and bustle nicely.

I'm almost finished with the costume, but I decided to reshape the corset bust line. So... I'm in the process of shortening the bones and re-tipping them, then there's re-assembling and decorating it. I was so close to being finished!

The last components are the hat and my tray, which my friend Nikko has offered to help me build! So close!


Thanks for looking! I'll post complete photos of the entire outfit once it is complete.

Wednesday, April 28, 2010

Burning Man Feather Bustle, Buttons, and Sleevelets

With an extra free day today, I spent the morning finishing up my Burning Man costume.

First up was the "bustle". I had a general idea of how I wanted this to look, so dug into building the base, which all the feathers and frills would be attached to. Using buckram and millinery wire, I made a heart shaped pad which I essentially quilted with batting and some thick fabric scraps, and backed with some faux leather. What I ended up with was a strong, solid base which I will snap and hook onto the bottom center back of the corset - that way the costume can travel easier and will last longer!


First I used millinery wire to wire a strip of lace I cut to use as a large bow. After pinning said bow in place, it was time to play with feather and fabric placement. Once I figured out how I wanted the colors of the feathers to blend and where I wanted them to lay, I heated up the trusty hot glue gun and started adhering them to the heart. All the feathers were glued down first, followed by the bow, some fabric scraps, and finally a vintage hair clip I've had forever. I finished it off with some of the same glass beaded fringe from the corset.
I think it turned out really cute! The last step, which will have to wait until I can get to a fabric store, is to sew on giant whopper poppers (the very technical name for giant snaps) to the corset and to the heart. Than, voila! A feather bustle fit for a Cigarette Girl!

Earlier this week I finished the closure on the pumpkin breeches - four cute gold buttons.


And finally, I also whipped up some cute little lace sleevelets. They're almost done, though I'm keeping my eyes open for the perfect lace to trim the hand in.


So the costume is almost complete! The last big component is the hat, which I hope to start in on soon!!

Thanks for reading and if you have any ideas or suggestions please let me know!